Client Access Setup
When setting up the Client Access system, there are a few steps that must be taken beyond the basic configuration.
Quickly navigate to procedures included in this topic by clicking one of the links below:
To Set Up the Contact
To Disable or Delete a Login
To Reset and Send Password
To Enable Existing Attachments for Portal Viewing
To Enable New Attachments for Portal Viewing
To Set Opportunity, Marketing, and Policy View Rights
To Make a Contact into a User
The client contact must be set up with a Login Name and Password to access the portal.
- On the Primary menu, click SEARCH. Search for the client with which the contact is associated.
- Click the Details
 icon next to the appropriate client.
- Click the contacts tab. The Contact Summary is displayed.
- Click the Details icon next to the appropriate contact. The contact details tab is displayed. There are three possibilities that may display at the bottom of the contact details tab in the User Information area:
- If the contact is not currently a user, a link will be displayed to make the contact a user.

- If the contact is currently a user for another entity, the following message will be displayed; "This contact has already been granted
user access through another entity. Users
cannot be granted access through
multiple accounts."
- If the contact is currently a user added by another staff member, go directly to the security tab to modify the user if necessary.
- If the contact is not currently a user, scroll down to the User Information area, click the link to make the contact a user. The Login Information area is displayed.
Note: When the contact is made into a user, there are a few rules that apply to the Login Name. The Login Name cannot already be in use by another user. The first email address entered in the contact's record will become the Login Name. Even if the user's email address is changed in the future, the original Login Name will remain the same and cannot be changed.
- In the New Password box, enter a password for the contact. Passwords will be accepted based on the password rules set up in SETUP > Security Administration > security policy tab.
Note: The rules on the security policy tab that are marked with an asterisk do not apply to the client access setup.
- Enter the new password again in the Confirm new Password box.
- In the Time Zone list, select the time zone in which the user resides.
- Select the check box under the time zone selection to Automatically adjust clock for Daylight Savings Time (DST).
- In the Login expiration date boxes, click the Calendar
 icon to select a date and enter a time for which the contact's access will expire. If these boxes are left blank, the login will not expire.
- Select the Notify admin upon login check box if the administrator must be notified each time the contact logs in to the client access portal.
- Select Login disabled when the contact no longer needs access to the client access portal.
- In the User Rights list, select the user rights template name that will govern the security of the contact.
- Click [Save] once all login information has been entered. Upon clicking [Save] the contact will be notified by email of their new Login Name and Password. The contact will be asked to change the password the first time they log on to the client access portal.
To Disable or Delete a Login
- On the Primary menu, click SEARCH. Search for the client with which the contact is associated.
- Click the Details icon next to the appropriate client.
- Click the contacts tab. The Contact Summary is displayed.
- Click the Details icon next to the appropriate contact. The contact details tab is displayed.
- Click the security tab, the Login Information area is displayed.
- Select the Login disabled check box to remove the contact's access to the client access portal.
Or
Click [Delete] to remove all security from the contact's record.
To Reset and Send Password
- On the Primary menu, click SEARCH. Search for the client with which the contact is associated.
- Click the Details icon next to the appropriate client.
- Click the contacts tab. The Contact Summary is displayed.
- Click the Details icon next to the appropriate contact. The contact details tab is displayed.
- Click the security tab, the Login Information area is displayed.
- In the New Password box, enter the new temporary password for the contact.
- In the Confirm new Password box, reenter the new password.
- Click [Update], a new email is automatically sent to the contact with the new temporary password.
To Enable Existing Attachments for Portal Viewing
- On the Primary menu, click SEARCH. Search for the appropriate client.
- Click the Details icon next to the client.
- On the Client menu, click ATTACHMENTS. The attachments tab is displayed.
- Click the Microsoft® Word
 icon (or other attachment icon such as Microsoft Excel®
  ) next to the attachment to enable. The Update Attachment screen is displayed.
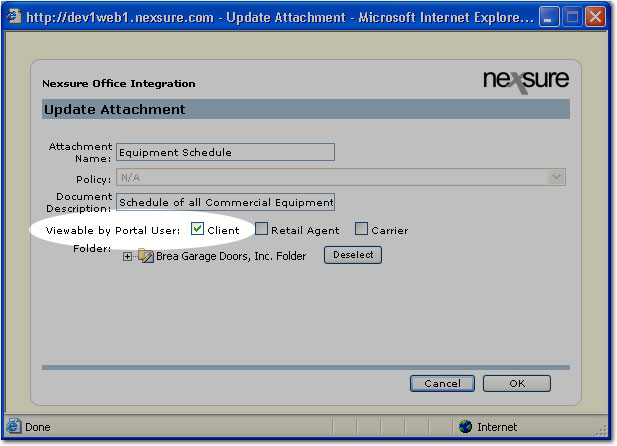
- In the Viewable by Portal User area, select the Client check box to enable the client contact to view the attachment from the client access portal.
- Click OK. The attachment becomes available in the client access portal.
To Enable New Attachments for Portal Viewing
- On the Primary menu, click SEARCH. Search for the appropriate client.
- Click the Details icon next to the client.
- On the Client menu, click ATTACHMENTS. The attachments tab is displayed.
- Click [Add New]. The Add New Attachment dialog box is displayed.
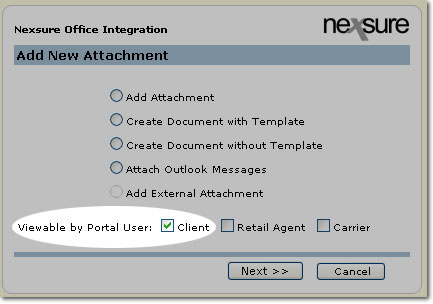
- In the Viewable by Portal User area, select the portal by which this attachment can be accessed. The following options are available:
- Client
- Retail Agent
- Carrier
Continue adding the attachment as described in Attachments.
To Set Opportunity, Marketing, and Policy View Rights
Each Opportunity, Marketing, and Policy record must be set up so that client access portal contacts can view the record.
- On the Primary menu, click SEARCH. Search for the appropriate client.
- Click the Details icon next to the appropriate client.
- On the Client menu, click MARKETING or POLICIES. In this example the POLICIES option was selected.
- On the policies tab, click the Details icon next to the policy to open up to the client access. The underwriting tab is displayed.
- Click the assignment tab. The Viewable by Portal User area is displayed under the policy header.
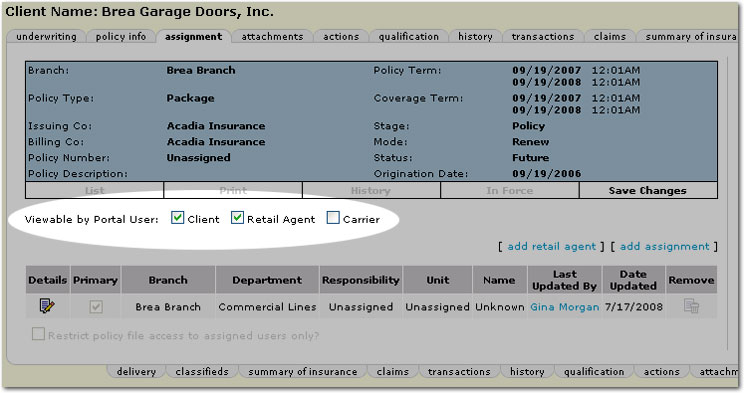
- In the Viewable by Portal User area, select from the following to allow the record to display to the contact:
- Client: Allows information from the record to be displayed in the client access portal.
- Retail Agent: Allows information from the record to be displayed in the retail agent portal.
- Carrier: Allows information from the record to be displayed in the carrier portal.
- Once selections have been made, in the Navigation Toolbar, click Save Changes. The selections are saved and the records become available through the portals selected.
Client Access General Configuration
Client Access Security